Sunday, February 27, 2011

This Week


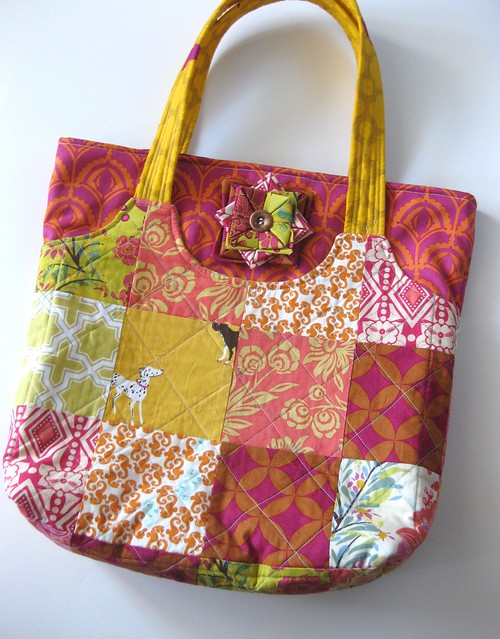
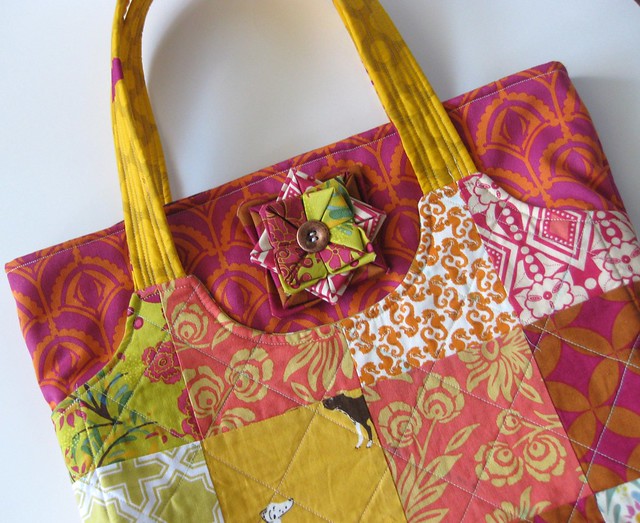
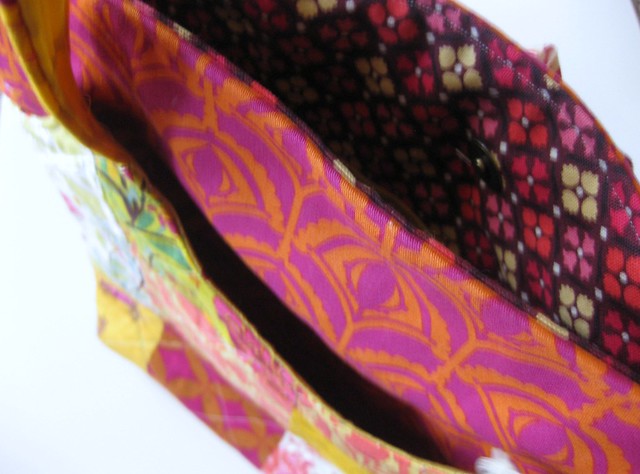
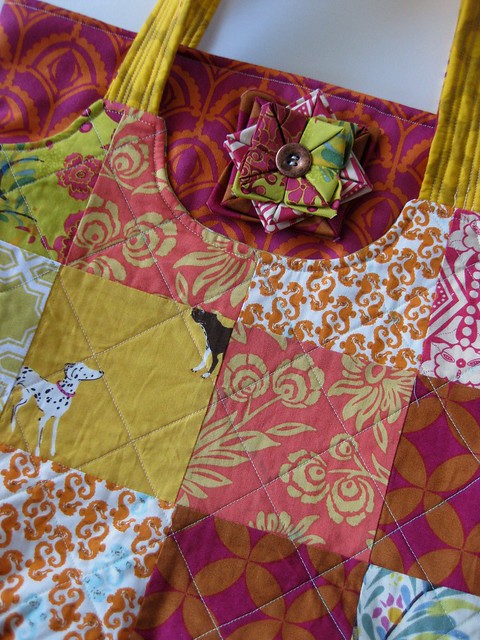
This past week...*whew*.  Let's just say I am glad it is the start of a new one!  I finished up my swap package for my swap partner in the Urban Home Goods swap.  I had this pinwheel block made up that I didn't know what to do with, but I was inspired by Jeni's patchwork zip pouch and decided to make a large zip pouch to go with the tote.  It is pretty large, but it would be perfect for embroidery hoops or other small projects.


Here is a look at the whole package!  Now this is when I declare that I am taking a swap break.  Haha!  I am going to try to not do any more swaps until May to give myself some time to work on my UFOs and work on some spring clothes for the girlies.  I figure if I say something on my blog it will help me stick to this resolution rather than giving way as soon as I see another fun swap starting! ;0)  

Angela's fabric diet challenge ended this week, and I am proud to say that I have gone eight whole weeks without purchasing a single piece of fabric.  I wish I had been as focused on all my unfinished projects, but I am seeing progress being made there as well.  


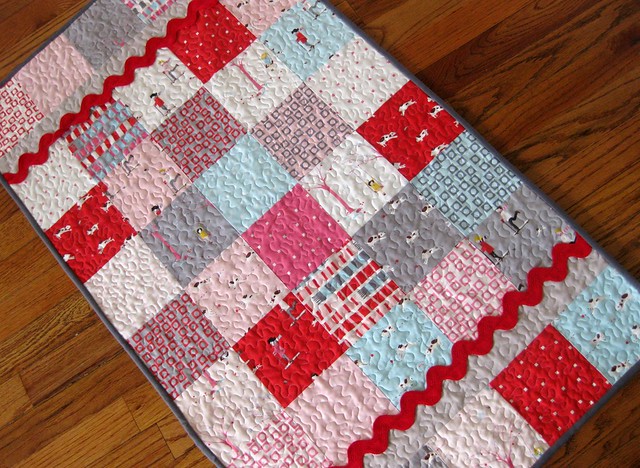
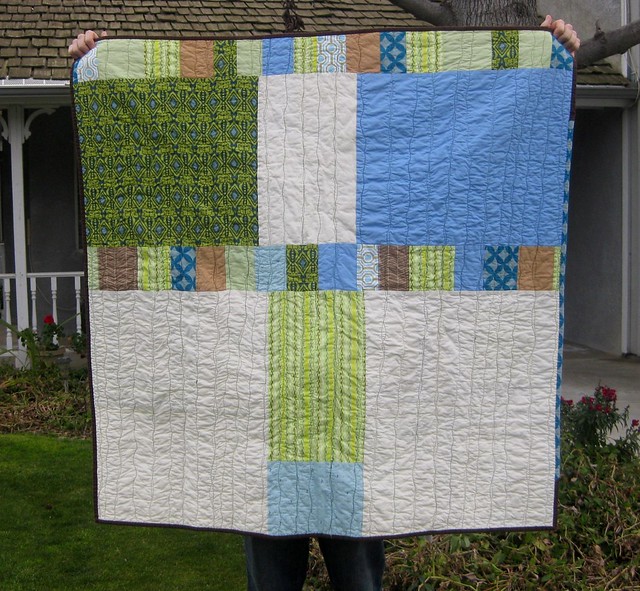
For example, I got the quilting done on my Authentic quilt and am getting ready to bind!  I think I bought the fabric for this quilt last February!   We had our first Bakersfield Modern Quilt Guild sew in yesterday! It was lots of fun yesterday at the sew in.  Terri has been sew fantastic (hardy-har!) getting this off the ground, and I know this is going to be a great group.  
  

Juliana requested a new skirt and picked out this fun pink fabric.  So, I am off to finish it up for her, while she enjoys strawberry pancakes at her Grams house.

Thursday, February 24, 2011

Simple Table Runner


I was lucky enough to get my hands on a charm pack of Aneela's Sherbet Pips around Christmas.  I knew I wanted to make a table runner with it.  I wanted to keep it a simple pattern because the fabrics themselves are just so darn cute.  I found this easy table runner pattern on Moda Bake Shop, and it was just perfect!  I used some light gray for the little bit of sashing and some darker gray as the binding.   The giant red ric rac really jazzes it up, I think, in just the right way.


I love how this turned out, and look how much better my stippling is getting!  I was so pleased with myself. Hah. ;0)  I am still having a tiny bit of tension issues on the back though.  Some spots just look kind of skipped over if that makes sense.  I tried adjusting the tension a couple of times, and it is only happening in certain spots.  I am using a Janome MC6600.  Any ideas?

I am linking this one up to Amy's Sew and Tell!  There are always lots of fun projects that are shared!

Tuesday, February 22, 2011

Giveaway Winners!

Thank you to all who entered the giveaway!

#24 Stephanie won the bag patterns!

#37 Sara won the quilt patterns!

Ladies- I will be e-mailing you shortly for your addresses!

The Pride and Prejudice Pillow


(I love this picture of Colin Firth.  I used to have this picture as my desktop background on my computer, which my college room mate teased me mercilessly for. *cough* Are you reading this, Sophie?)

"Pride and Prejudice"- if you haven't read it, well....better get to it!

  When Sew Mama Sew announced their pillow contest, I was a little deflated when they said they wanted a pillow with "words to live by".  I kept looking at all the fun, spunking sayings, but they just weren't "speaking" to me.  Then I remembered this etsy shop I found around Christmas, and inspiration came. ;0)  I also thought this idea would work well for Lil Blue Boo and Dharma Trading Design Challenge.  Two birds with one stone!


I used Mr. Darcy's original proposal to Elizabeth.  

"In vain have I struggled.  It will not do.  My feelings will not be repressed.  You must allow me to tell you how ardently I admire and love you."

These words don't necessarily scream "words to live by", but they do to me.  In the book (if you haven't read it) this declaration is the first sign that Mr. Darcy has any romantic inclinations towards Elizabeth.  Before all you see is a hard, prideful man who always criticizes.  I remember the way my heart stopped when I first read this declaration of love.  *gasp*  The man.loved.her....ardently!  These words don't immediately win over Elizabeth, but because he spoke them he does eventually win his lady's heart.  These words remind me that things aren't always as they seem, and not to be afraid to say what is on your heart.  


Don't give up on finding your Mr.Darcy, ladies!  I was lucky enough to have found mine. ;0)


 I tried to keep things simple with this pillow and make it something you might find in Jane Austen's house.  For the words I found a fun Jane Austen font, typed it up, and used t-shirt transfer paper to iron them on to some notebook type fabric.  I then cut this out, added some piping, and framed it in linen.  I added some chiffon roses to one side for a romantic look. :0)  For the binding I used a black and white stripe print from Sweetwater's Authentic line, and I added some cream lace that I had in my stash that couldn't help but make me think of Mrs. Bennett.


I don't know if this pillow is going to win any prizes, but I have to say that I really had fun making it!  

Friday, February 18, 2011

Elephants on Parade Pillow


Spring has arrived here in California and with it many allergies, plus add some sort of virus and a teething baby.  Well, I just haven't gotten out of the house much, but I have been productive in the sewing department.  


Remember this quilt block that I made for my bee quilt?  I loved this block so much.  I couldn't get it out of my head to make a pillow just like it, but I am laaaazzzyy.  So I decided to just use the quilt block I already made for the quilt for the pillow instead.  I added some thin borders of gray and a bit of the bright pink.  I love how the bright pink blends with the rest of the fabrics but really pops and catches your eye.  I then added a scrappy border and put some more elephants in the corners.  I wanted to use the gray for the binding but ran out of the medium gray I was using for the sashing, but luckily I had some Kona charcoal that worked really well.  Whew.  Didn't have to break the fabric fast. ;0)


For the quilting- I kept it simple.  I used a variegated yellow thread.  My machine has this triple stitch that I really like because it makes the stitching stand out more and kind of has a hand stitched look.  I used that for the center sashing and then outline stitched the center blocks and outer sashing.


For the back I used this Amy Butler Midwest Modern print, since it incorporated all the colors that I used for the front.


Just one more shot... just because...:0)

I am entering this one into Rachel's Pillow Party!


Thursday, February 17, 2011

Pattern Review- State Street Tote


Fabric: I used a lot of different fabrics for this- mostly Anna Maria Horner Good Folks and Drawing Room, Joel Dewberry, and Heather Ross. The inside is lined with Densye Schmidt County Fair canvas.

When I fist saw that Bari J. came out with sewing patterns, I fell in love with this tote.  I loved how you could make it patchwork or make it out of a single fabric.  I made this tote for my partner in the Urban Home Goods Swap.  She likes warm colors, so I chose lots of oranges, yellows, and reds.  These really aren't the colors I am naturally drawn too.  I am definitely am more attracted to cool colors, but after finishing up this bag I am totally sold.  The size is good- not too small or too big.  Plus, I love the outside pockets of this bag.


The pattern itself is very well written, and I didn't find any errors with any measurements or directions.  You can also use a spring closure for this bag, which she gives directions for as well.  I used a magnetic snap for this one, but I definitely want to make one for me with the spring closure.  I love the thought of my bag staying opened or closed.  


As much as I love this pattern, I don't know if I would recommend this to a beginner.  There are a lot of layers to this bag, which I think would be tricky for someone not experienced with making bags.  Also, there is no doubt in my mind that you need a walking foot to make this bag.  It definitely saved me when I was sewing the outside of this bag together.  I think there were something like 8 different layers being sewn together at one time.  The only thing I did differently for this bag is that I used cotton batting instead of fusible fleece that she recommended, since that is what I had on hand.  I just spray basted it on, and it worked quite well.


I also made a little fabric origami flower pin to spice up the front a bit.  You can find the pattern for this flower here.  Just watch your fingers.  These are pretty fun to make, but I always get myself with the iron!

Also, check out my pattern giveaway!  You can still enter until Sunday, February 20th!

Sunday, February 13, 2011

Josiah's Quilt...Finally!...and a Giveaway!


I finally finished up Josiah's quilt this week.  I bought the fabric last April, started in October, and finished in February.  At least I got it done before he turned one.  You can see my pother posts about this quilt here, here, and here.  I used Oh Fransson's Canasta Quilts pattern, and as all her patterns are it was an excellent, well written pattern.  I like how you don't have to add any sashing to this pattern but still get illusion of sashing with the addition of the neutral.  However, there is a lot of cutting for this pattern, and I am glad I didn't have to make anything bigger than this.  I made the baby size, and it measures around 48" x 48"- which is pretty big for a baby quilt.  So I am hoping this quilt will turn into a little boy quilt as well. ;0p

At first I was going to stipple this quilt, but I thought I would try something different.  I did some wavy line randomly down the quilt.  I thought it would give kind of a watery type look.  Quilting it like this was actually harder than I thought it would be.  I was going for something similar to how I quilted this mug rug, but it was much harder maneuvering the fabric just right on a big quilt.  If I had to do it over again, I would have stippled it.  Ah well...


I had lots of leftover fabric, so I just pieced both the big pieces and little pieces together for the back.  


Today also marks this little blog's two year anniversary!  I have had lots of fun with this blog.  I have met so many nice people and gotten the chance to participate in lots of fun sewing adventures.  

With closing down the pattern store I still have lots of fun patterns leftover, so I thought I would share some with my readers to celebrate!  I have two sets I will giving away.  Three bag patterns and three quilt patterns.

To Enter:
1. Leave me a comment letting me know how you found out about my blog and which pattern set you are interested in!
2.  For an extra chance- become a follower (or if you already are), leave another comment
 telling me!

I will keep this giveaway open until next Sunday, February 20th.


Wednesday, February 9, 2011

Valentine Cards!


I finished up my girls' Valentine's cards this morning, and they just turned out so darn cute.  I saw a lot of these popping up on crafty blogs last year and knew I wanted to give it a try this year.  You can find a simple little tutorial on how to do them here.  Juliana was a natural poser, but you should have seen me trying to get Felicity to stand still for just one second.  The kid just can't stay still- as much as she tries!


Here is the basic unedited picture that I started out with for Juliana.


I just uploaded the picture to Flickr and then edited it in Picnick.  You can add text and borders, and I added a heart as well to cover up the unsightly outlet. ;0)  Easy peasy.

Monday, February 7, 2011

Quilt Block for the Bee Quilt


My Fussy Cut Bee blocks have been coming in over the past few months.  I have received so many amazing blocks.  I am so excited for this quilt. (This one is going to be for me!)  I am waiting on one more person, and I will have received them all.  I took a break from quilting Josiah's quilt to make another quilt block myself.


For this quilt my theme is improv log cabins.  When looking for inspiration for the quilt I fell in love with blocks that involved little mini blocks.   One thing I have discovered about making a block like this is that I love how you are constantly creating.  With more traditional blocks you start off with a design, you pick which fabric goes where, and then you put it together.  With this kind of block I start off with a basic idea of things I want to implement, but I can keep "creating" as I go along.  I love seeing how it all ends up!  You can see my other block that I made for this quilt here.

Have you seen Quiltstory's Block Party?  Make a block and join in!  


Friday, February 4, 2011

Another Mug Rug!


I have come to the conclusion that one of the reasons mug rugs are so popular right now is that it provides the quilting fix in such a quick, satisfying period of time.  I am in the middle of quilting Josiah's quilt, and it is just such a bear to quilt.  You have to maneuver it just so, and my arms start to cramp and my back begins to ache.  Anyhow, not so for little things like mug rugs!


I made this one for Beth of Project.  She has a great blog and is currently doing different crafty book reviews.  I got to know Beth a bit after she was my swap partner in the Scrappy Hoops swap.  I made her this!  We decided to do a little private swappy-swap.  She wanted a mug rug for their new french press and made this mosaic for inspiration.  I noticed lots of color, crosses, funny little characters, and gray.  I was pretty pleased with myself for incorporating so many of those things all in this little rug.  I quilted it with some wavy lines in some variegated yellow thread.  I love variegated thread.  It just looks so pretty on the spool.  


For the back I used some Anna Maria Horner Good Folks.  Bright and cheery!
Related Posts Plugin for WordPress, Blogger...