Monday, December 21, 2009

First Dance Recital


Juliana had her first dance recital last week. She has only been in the class for a couple of months. She did so well, and I was so proud of her. I decided last minute to make her a Christmas-y skirt instead of having her wear a red one she already owned. She loved it. I made a matching one for Felicity too, and they have both worn them a few times this past week.


After the recital the girls got to meet Santa Claus. It went infinitely better than last year, when Felicity screamed and Juliana was too shy to look at Santa. This year Juliana hopped onto his lap and told him immediately what she wanted before he could even say hello. Felicity, on the other hand, refused to move her head from that position. She did not want to look at Santa.


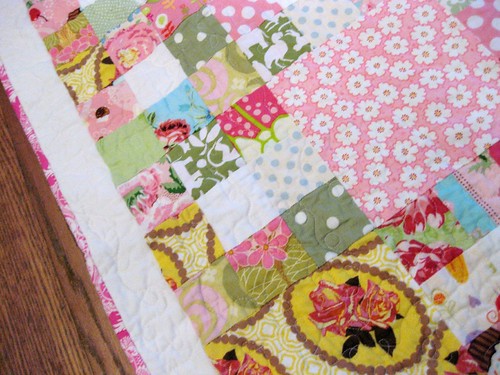
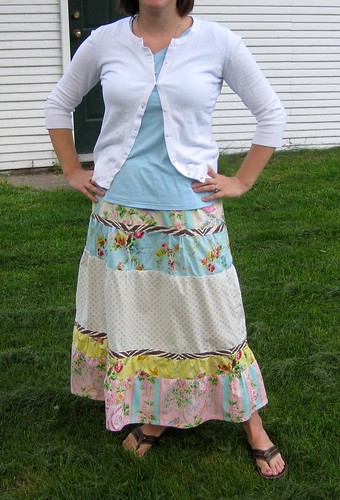
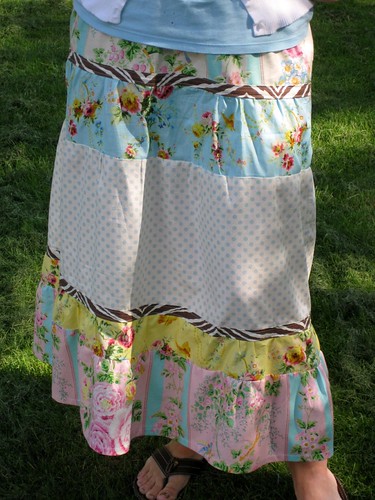
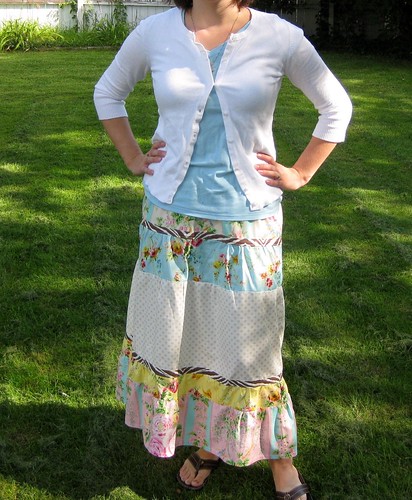
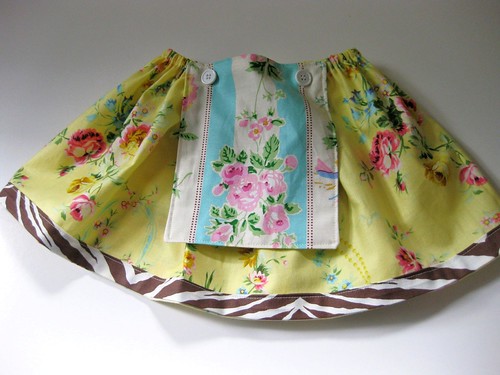
Here is an up close shot of the skirt. I used some red and white Casey Scroll fabric that I have had forever that I originally intended for something else. I used this pattern from Zozo Bug Baby. I have made this skirt several times, and I love how easy it is. Everyone loves the apron, and I made this apron with green on one side and red on the other. That way when Christmas is over it won't look so much like a Christmas skirt as a red and white skirt.

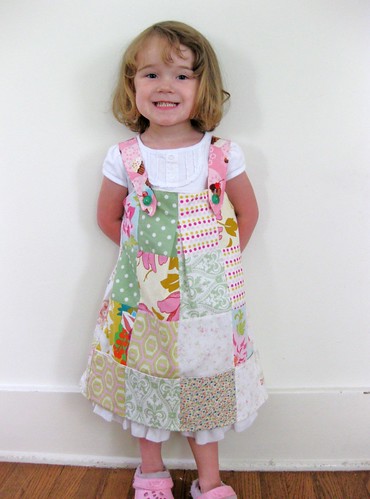
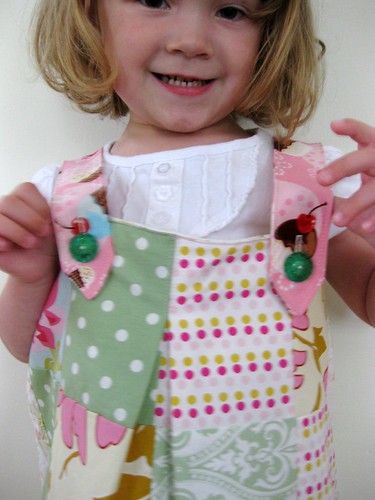
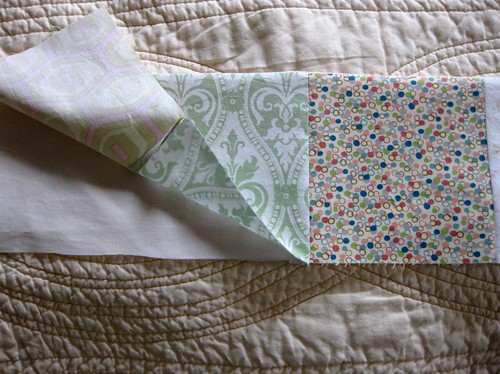
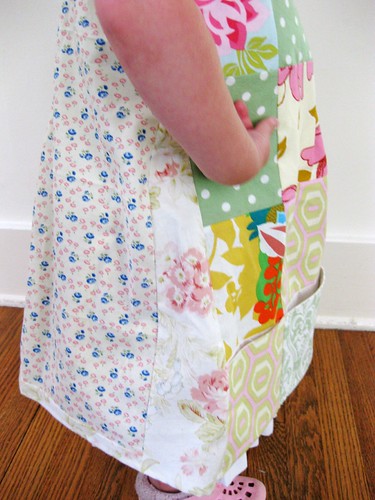
I have been working on the girls' Christmas dresses using this pattern. I am mostly finished with one, and hopefully will get the other started today. I am also making some pettiskirts for the girls for Christmas. Wowza. Those take more time than I thought. I have to borrow my mom's machine as she has a ruffler foot, and it makes it go by so much faster. I don't think I would attempt one of these without one. I also have made some Jane Market Bags as some gifts and have a few more to go. Nothing like waiting to the last minute! Hope you all have your Christmas sewing under way and wrapped up soon!

Monday, December 7, 2009

Baby Quilt


I have been so inspired by Crazy Mom Quilts with all the quilts that she makes from scraps and had a lot of fun participating in her first scrappy nine patch quilt-a-long. So I made another scrappy quilt for a baby. It is made entirely from scraps front and back except for the binding which is some Jennifer Paganelli Flower Power. I inserted some bigger pieces of fabric and kind of wished I just made a few more scrappy blocks instead, but this is only my third quilt, right?


This is my first time doing free motion on a quilt. It was hard! It definitely got easier as I went along, but I am glad I didn't try anything bigger than a baby quilt for the first time. I just did some little swirly things because whenever I have practiced stippling it just looks funky to me. I was really impressed with how the quilt just looked different though once I washed it.


I used some Amy Butler Love for the back from leftovers from some pillowcases I made. Love, love this line of fabric.

Also, the winner of the giveaway is Duff! Congratulations! I sent you an email, so please send me your address! Thanks to all who participated!

Tuesday, December 1, 2009

Christmas Giveaway!


Janelle Wind's new Audrey bag pattern!


I am taking part of Sew Mama Sew's giveaway! Welcome and Merry Christmas! I know, I know...I haven't posted in forever. I think moving across country while pregnant took it out of me. Yes, we are expecting #3 sometime in May! And...it is a boy! My husband is happy. Anyway, my energy levels are slowly creeping back, and I should be posting more and sewing more! I just finished a baby quilt today, and it turned out so cute!

On to the giveaway....
I am giving away TWO patterns to one lucky winner, the Audrey bag by Janelle Wind and Rudy by Melly and Me! Just run over to my shop and take a looksie. I am having a big sale. FREE SHIPPING and lots of patterns are discounted, so check the sale section. Then leave a comment and let me know what your favorite pattern is and what kind of patterns you buy mostly. Clothing for kids, for you, quilts, bags, etc? Don't forget to leave your email address, so I can contact you if you win! The giveaway closes Dec 6th around 8 PM PST. NOW CLOSED! THANKS! Winner announced tomorrow!

Melly and Me's Rudy!

Monday, October 12, 2009

The Shop is Open!


Just a quickie post to let you all know that the shop is now open! Thanks to all those who waited patiently! I do have some new patterns in the shop as well, so check those out.

Over the next couple of days I will be discounting a lot of patterns to make room for some new ones! Please let me know of any specific patterns you would like to see in the shop! The new Sew Liberated Patterns should be here any day!

Tuesday, October 6, 2009

Crazy


That is the only word I have for describing our August and September. The move itself went pretty smoothly. Closing on the house took a month longer than anticipated. However, we are here! I have lots to write about, and I haven't sewn for weeks. I am totally feeling the itch. I did, however, purchase this sewing cabinet yesterday and can't wait for it to get here.

I am planning on reopening the shop on Monday October 12th! I have some new patterns already here and others on the way. I love the change of seasons! Always brings new inspiration!

The above photo is something made last fall, but I really like it. It is an Apron Overlay from Amy Butler's Barcelona Skirts pattern. Have you seen her new patterns coming out? Oh, and the fabric! Yummy. Anyhow, it just feels too weird to post without a picture, and I don't know where our camera cord is yet. Still sooooo many boxes to unpack. Boo.

Tuesday, August 4, 2009

We have...


a job in California and we are officially in escrow for a cute little house! Life is busy and is only going to get busier. I expect sewing and blogging are going to be taking a backseat over the next month. We are excited for the upcoming changes and a little nervous too! We feel very blessed.

I will be closing up my etsy shop for the next month starting next Tuesday, August 11th. So if you have been eying a pattern and can't wait until September I suggest you order in the next week! I know I want to rearrange the shop as well, and I think taking this month off will let me reassess and pray about what direction the shop should take.

Since there isn't any crafting in this post, have a little look at some of these fun tutorials that I have bookmarked in my favorites!

Knitting Needle Roll by Lupin Bunny
How to make a digital quilt mockup by Sarah Seitz
Little Patchwork Dress by Crazy Mom Quilts (Really love this!)
Birthday Banner by See Mommy Sew
How to sew a double sided purse strap by Fat Orange Cat
Superhero Cape Tutorial by Puking Pastilles
( I made one of these for a little boy and it was the hit of the party!)


Sunday, August 2, 2009

Make It Perfect's Flirty Skirts Pattern Review


You can find the Flirty Skirts pattern in my SHOP!

Description from back of pattern:
Flirty Skirts will be the most comfortable, relaxed skirts you will ever make or wear. Featuring cascading tiers and patchwork designs, Flirty Skirts will leave you feeling free and graceful. Gentle gathers between each tier create a soft, feminine look - perfect for a day in the countryside, unwinding at the beach or some fun shopping. Whether you choose to make a stunning long or short ladies skirt or a delightful little girl's skirt with matching applique top, Flirty Skirts are guaranteed to make you happy!!

Pattern includes the following sizes:

LITTLE GIRL'S SKIRT -
sizes 6 months, 1, 2, 3, 4 and 5

LADIES LONG AND SHORT SKIRTS -
x-small: hips 36" or 91cm / midriff 26 1/2" or 67cm
small: hips 38" or 96cm / midriff 29" or 74cm
medium: hips 40 1/2" or 103cm / midriff 32" or 81cm
large: hips 43 1/2" or 110cm / midriff 35" or 89cm Added on May 21, 2009


Material and material requirements:

This depends on the skirt you make and your size. I used a five different 1/2 yds from a set of Jennifer Paganelli's Flower power line, and about 2/3 yd from a blue and white polka dot fabric from my stash.

Pattern as described/shown?

This skirt turned out very well and looks very much like the long skirt shown on the pattern. I was trying to work with a half yard set that I already had in my stash, and so I ended up being about an inch and a half short for one of my pieces. I am short so I didn't think this would be a problem. However, it is just about perfect on me, and I am short (5'3"). Plus, I am wearing this skirt at right about my belly button. So if you are tall or want to wear it higher on your waist I would probably add an inch to a couple of the tiers.

How were the instructions?

The instructions were clear and well organized. I was never confused, and there were just enough diagrams to help understand her directions.


Difficulty of pattern?


This is a pretty easy pattern. The only difficult thing is the amount of gathering you have to do for each tier. So I would say that you should at least have done one gathering project before attempting this pattern just to avoid frustration. However, there are no real pattern. You just cut rectangles (rotary cutter comes in handy for this!) and the overall construction is simple making it a good project for a beginner!

Alterations made?

The only alteration I made is just shortening a couple of tiers to accommodate using the half yard cuts I already had. Otherwise, all directions were followed. I did, however, have about a yard extra of trim leftover from the zebra print. So you can definitely cut out less. You also might want to top stitch on the tiers that are not covered with the trim just to give it a cleaner look. I keep meaning to go back and do it to mine, but you know...there are other things to sew! ;0p


Overall Impression

I love my new skirt! I don't have any long skirts currently, and I love the soft ruffles and feminine feel of this skirt. It came together quickly. I made this skirt on a Saturday for a fun and easy weekend project. I also love the fact that it comes with instructions for making a little girl skirt as well.

Friday, July 31, 2009

Summerhouse Pillows and an Artist


Summerhouse pillows. Aren't they pretty? I love patchwork. I love turning little bits of leftover pretty fabrics into something big and pretty.


The back. I love this bright, cheery fabric. I got this at Joann's. I must admit that I think Joann's is getting some better stuff as of late.


The pattern is by Alicia Paulson. It is quite easy, and she uses a different way of doing the patchwork using iron on interfacing. She has a tutorial for it here. I used blues and greens, and they fit perfectly over a couple of busted pillows I had that I have been too lazy to do anything with the past couple of months. I didn't put piping on my pillows because I didn't have any, and I just didn't want to go all the way across town for piping. I do want to make two more though...with piping. ;0p


Now this...this is my little artist. She draws all.day.long. She is particularly proud of this little pony. She asked me to take a picture and has so far shown it to everyone we have seen today who is willing to take a look. She draws in coloring books, on pieces of paper, on cards, while she eats, while she watches a movie, and even when she is outside.


This is one of her outside drawings. This is her Grams. She has just learned to draw faces. What is the blue line across the face that looks like Jordy from Star Trek? Grams' glasses, of course!

Wednesday, July 29, 2009

Melly and Me's Fat Quarters Bag Pattern Review


A review of Melly and Me's awesome Fat Quarters Bag (However, be aware that fat quarters are different in the US and therefore you will need a little more fabric.) by none other than my own mother...


Pattern as described/shown:
I was never interested in making this bag until I purchased 3 Wonderland (by MoMo) Fat Quarters. The FQ were all in cream color. I loved wonderland and knew immediately I needed to make this purse. After I purchased it though, I realized the Fat Quarters were in metric countries. Because we are not metric, I needed 2 - 15" squares for the main bag and lining. Grrrrr.....that didn't stop me though!! I was able to cut the main bag with the fat quarter I had (even though it was a directional fabric, it didn't matter too much because the fabric was kind of crazy anyway and the handles would hide the tree trunks going sideways). As for the lining, I had just enough material in my stash that went perfectly with the wonderland. So off to the sewing machine...

How were the instructions?
As with all Melly and Me patterns the instructions were excellent. She does things a little differently because she is a quilter (and I am not). But they are easy to understand. Plus, on this bag, the main bag is quilted. Because it is such a small piece, it's not hard and you can be as creative as you want. The only thing I don't like is the lack of pictures. I would have especially liked a picture of the side of the bag to see what that was like!

Difficulty of pattern?
Very skilled beginner and beyond.

Alterations made?
Yes, I made a few alternations. She wanted you to quilt it like the picture, I chose to do a different quilt pattern. I didn't like how she had you sew the sides, so I put in 4 eyelets (I do not recommend this because of all the layers of fabric and fleece you have to go through. I should have used grommets, snaps, or buttons). I also sewed in a pocket in the inside. What is a purse without a pocket?

Overall impression?
I liked it. I thought the purse turned out pretty cute. I made it for a 18 year old, so I thought it had a youthful flare. I wish she would have given the overall dimensions of the purse (they are approx. 9" tall without straps, 12" in length, 4" wide). I have made several Melly and Me patterns and I think they are fun to make. I usually like the way they turn out, this one was one of my favorites.

Sunday, July 26, 2009

My sewing wanes...


We are house hunting...in California! All very exciting, but I find myself staring at houses on the computer rather than sewing. I just can't help myself. *sheepish grin* However, I still have a few completed projects that I haven't posted about. Look for a review of Melly and Me's Fat Quarter Bag and Make It Perfect's Flirty Skirts pattern later this week!

I did make a couple of baby gifts this week. The little pants are for a new little baby boy. I used the Britches and Bloomers pattern. Quick and easy. I used some linen and Heather Ross dots. I realized I don't have much boy friendly fabric in my stash. It was between the dots annnnddd nothing else.


This little skirt is for a little baby girl. I based it off this pattern but I needed it smaller than what the pattern went to. So I just used a 1/4 yard and added a little zebra cuff instead of hemming it. It is a pretty simple pattern, and if you have made a simple girl's skirt before I am sure you can figure out how to make something similar. I used Flower Power for this skirt. I love Jennifer Paganelli. Nothing unfeminine about her style.

The little apron is reversible. I like that you can even take it off if you aren't in an apron styling mood either. ;0p


Monday, July 20, 2009

A Dress and a Quilt Top


I am behind on the ol' blog! I made this Flower Girl dress from Heather Ross's Weekend Sewing for Juliana to wear to the rehearsal dinner for the wedding she was a part of. It was super simple and should have been quick to make, but I was making it at midnight and was distracted and tired and this simple dress needed to be ripped out about six times. Ridiculous. Definitely don't sew past midnight. I used Tanya Whelan Darla for this one. I love Darla. I just bought a bunch of it to make some quilts for the girls' room. It just speaks little girl to me. I also added some eyelet at the waist to dress it up a bit (and hide my mistakes. ;0p)

Here is the back. (Felicity wanted in on this one too.)


Just because. ..
She is just too darn cute. (She is wearing the Claire Dress by Portabello Pixie that my mom made her.)


I also finished my quilt top for Amanda Jean's quilt-a-long. Wahoo! I love it. I am so proud of it. I used all scraps for this, and it didn' even make a dent. Horrible! I tried to use only bright and fresh colors for it. I had a couple of browns in there, and it just didn't look right. I only made 42 blocks. I am going more for a lap size quilt here. I was so excited by this that I didn't even iron it before taking a picture.

Monday, July 13, 2009

Pattern Review: Study Hall Skirt by Anna Maria Horner


Nichole of Indie House brings you this pattern review of Anna Maria Horner's Study Hall Skirt Pattern. Check out all of her wonderful creations!

The pattern can be found in my shop: http://mvansciver.etsy.com!

Description from back of pattern:
Bookish? Yes! Boring? Never! This kicky pleated skirt has plenty of flattering structure, but lots of room for interpretation. Four inverted box plats, 2 front & 2 back, and border all around leave you a novel of options!


Material and material requirements:
44in Wide Fabrics/ 54in Wide Fabrics:

1 1/3 yards for main skirt fabric

1 yard for contrast fabric

Allow extra yardage for matching or centering prints.

Suggested Notions & Tools:

1 Spool of thread in coordinating shade, craft scissors and sewing scissors, rotary cutter and mat (optional), straight pins, measuring device, fabric markers or chalk, iron and ironing board, pressing cloth, turning tool, hand sewing needle, One 9 in invisible zipper in coordinating shade, invisible zipper foot, small hook and eye

I used a home decorator weight fabric by Alexander Henry for the main skirt fabric and Kona Cotton in black for the contrasting fabric. Personally I think this skirt needs the structure of a heavier weight fabric. You could certainly use lighter weight quilter’s cotton but if you do I recommend reinforcing it with interfacing.


Pattern as described/shown?

I ADORE this skirt! I’ve been looking forward to making it since images of it were released on Anna Maria Horner’s blog but I was worried it would be too hard. I’ve seen a few reviews saying it requires intermediate sewing skills but I don’t think that’s true (and I am definitely a beginner!). Yes there are a lot of pieces and that can be off putting but really you do the same set of techniques four times and you are done!


How were the instructions?

The instructions were fairly clear and there were lots of line drawings to accompany them. I had to reread some of the instructions for the box pleat the first time but I was able to figure it out quickly.

Difficulty of pattern?

Skilled Beginner. This shouldn’t be your first skirt but if you’ve completed a garment or two then you will be fine!


Alterations made?

I didn’t make any alterations. I knew the size small was a little large for my waist line but I wanted it to hang lower than my b
elly button. Next time around I may shorten it so that the hem hits above my knee the way it does on the pattern cover.

Overall Impression


I loved it. The cutting and zig zagg
ing of all the raw edges was time consuming but once I started sewing the pieces together I couldn’t stop! Now I don’t want to take the skirt off, I’m already planning two or three more.


Sunday, July 12, 2009

Wedding Madness


The past few days have been devoted to wedding madness. Our good friends got married yesterday, and Kurt was the best man and the girls the flower girls. Good times were had by all, and the happy couple did indeed look quite happy. Awhile back I mentioned that I was going to be using the Birthday Dress pattern by Oliver + S for flower girl dresses. Juliana had worn hers already to a previous wedding, but I wanted to wait to show pictures until I had both of them made. The procrastinator that I can be there was a little sewing all the way up until 45 minutes before the wedding! I used dupioni silk for both dresses and green ribbon for the tie. It was my first time using any type of silk, and it was tricky. It frayed so quickly. I was really happy to have a serger to finish those seams. I made some bolero jackets to go over the dresses that I thought turned out pretty cute, and I added some pretty lace to the bottom. I didn't iron the pleats all the way on these dresses to give them a bit of a flowier (is that a word?) look.


Flower Girl #1- Loved the whole thing- the dress, the flowers, the pretty bride, the dancing, and best of all---cake!


Flower Girl #2- A little bit more hesitant about the whole wedding thing. I think this was the only real picture she smiled for. Most of the others involved a bit (okay....A LOT) of crying. Flower Girl #1 had to do a bit of dragging down the aisle to get Flower Girl #2 to come with. Flower Girl #2 decided it was best just to close her eyes and pretend no one was looking.


Me, the flower girls, and the (handsome) best man


Flower Girl #1 and the beautiful bride

Wednesday, July 8, 2009

Shoppity-shop udpate!


I have lots of new patterns in the shop and more coming! These ones are from Australia though and particularly awesome!

I had so many requests for the Candy Girl Quilt pattern after my last giveaway that I now carry it! It really is so pretty.


I also got in Melly and Me's new book, Kaleidoscope! Twelve projects all in one book. The pictures are really pretty. Quilts, softies, and bags. Just what you would expect from Melly and Me.


Also, this little lady and her brood are joining the group. I love Clucky and her chicks! The little pocket for the chicks is so cute!

I also have Make It Perfect's Downtown Girl jacket pattern back in stock. Those went so fast last time!

Saturday, July 4, 2009

Pattern Review: Little Picasso- A Simple Play Smock


Front view

Little Picasso Pattern- You can find it in my shop!
Description from back of pattern:

These simple painting or playing smocks are cut from two squares and sever rectangles total. No templates or patterns, just a few cuts will yield these sweet little apron styles msock great for kids of any age. This loose fitting, casual size fit ages 3-5 with simple strap and gusset alterations. Tips given for easy sizing up to 7 years old. A simple size chart is also provided for reference. Choose patchwork or plain styles, gathered or tucked...a fun afternoon project any way you stack it!

Material and material requirements:

This pattern uses quilting cottons.

Patchwork Smock:
1 Charm Pack OR 16 5" squares for front
1/4 yard for pocket back
5/8 yard for back
3/8 yard for pockets
1/4 yard for gusset
1/8 yard for straps
1/8 yard for facing

Soft Vintage Smock:
5/8 yard for front & back (OR 2 separate 5/8 yard cuts if you want different colors on front and back)
3/8 yard for pockets
1/4 yard for gusset
1/8 yard for straps
1/8 yard for facing


Plus two buttons for straps.


I used different fabric scraps for the different parts of the apron, which I always find fun. It is nice putting those nice scraps to use! The only part I didn't use a scrap was the back, which I used a fat quarter for. For the buttons I used two little green vintage buttons that I got awhile back from our farmer's market.


Pattern as described/shown?

Overall, I was very pleased with how this smock turned out. I made the patchwork version with the center pleat. I do think it turned out just how it was shown on the cover. However, I think this pattern is maybe a little more complicated then it is made out to be because you do have to "make" the pattern pieces yourself as you cut.


Juliana shows off her straps!


How were the instructions?

This is where this pattern falls short. I thought there were some definite areas that needed more explaining (especially if you haven't made clothing before) For example, she doesn't explain to clip the corners on the straps so that the points come out nice and smooth, and she doesn't give instructions at the end for a buttonhole an far down to place the buttons.


Shorter back matches the patchwork pocket front.

I also thought some of the measurements were off.
1)In the patchwork version she has you cut out two 5 1/2" x 18 1/2" rectangles for the back of the pocket. However, this did not match up when you added the front part of the pocket. So, I cut these out 5" x 18 1/2". I don't think this is a problem in the simple version since you just cut one big piece and fold it in half.


Gusset

2) I also thought the gusset measurement was too long, but this isn't that big of a deal since you can just shorten it once you sew it all together and before you hem it to see where it needs to be.

Back of Smock


Difficulty of pattern?

Intermediate
This pattern wasn't difficult but because you have to cut and make the pattern pieces and the instructions were not the clearest I would not recommend this pattern for beginners. Since I have made similar things to this I didn't find it that big of a deal, and it still came together fairly quickly. It only took me about three hours. So, if you are familar with clothing, I think you will be able to see what needs to be done and where you need to "fill in".

Alterations made?

I didn't make any alterations to the pattern except for making the measurement changes that I mentioned above. I also used a fat quarter for the back which was 1/2" shorter than what the pattern called for, so I sewed on a little strip at the bottom to lengthen it.

I think this pattern could easily be made without the gusset. I don't know if it adds much to the pattern necessarily, except I think it gives it a cute patchwork look! However, if you want to skip a step this would be it. I also think you could make the whole thing out of patchwork if you wanted. She has you use a single piece of fabric for the back, but you could easily make a patchwork back for this as well.


Overall Impression

I really liked this pattern. I think it is super cute and pretty quick to make! I think next time I make it I could sew it under two hours. It is perfect for Juliana for her art projects and when she helps me make choc-o-latte cookies with me! She immediately stuffed some crayons in her little pockets at the bottom, and she was all set!

Related Posts Plugin for WordPress, Blogger...