Monday, March 7, 2011
New Spring Bag!
Thursday, August 12, 2010
Castle Peeps Skirt

When I first saw Castle Peeps I knew Juliana would love it. She draws castles and princesses all. day. long. I literally have hundreds of sheets of papers covering my house filled with drawings. (It sometimes drives me a little crazy. Not the creative part....the paper all over my house part.)

I decided to use the Tea Party Apron Skirt pattern by Pink Fig for this skirt. I carry it in the shop if you are interested.
A little review of the pattern:
I have never used a Pink Fig pattern before, and I liked her style. Pretty tutorial-ish. I don't like how it is on a big piece of paper that opens up b/c it is just too big to really put anywhere, but a lot of paper patterns are like that. The steps were clear and easy to follow. However, she does assume that you know how to sew and are not a beginner. She doesn't explain things like gathering.
I didn't alter the pattern at all except to leave off the apron because well...I think it looks kind of silly. Plus, I in no way wanted to hide the Peeps of the Castle land! She also includes a little flower tutorial in the pattern too to jazz up a t-shirt or the apron, if you want to make one.

Do you see the baby in this picture? I just noticed him! (and the other little hand resting on his head. Poor little guy gets a lot of head pats.)

Juliana could not wait to wear this skirt, and fortunately the girls went to a tea party birthday party and got all dressed up. Felicity is wearing her Claire tie knot dress. It is funny how using the same fabric for the trims make them look they go together so well.
Sunday, August 2, 2009
Make It Perfect's Flirty Skirts Pattern Review

You can find the Flirty Skirts pattern in my SHOP!
Description from back of pattern:
Flirty Skirts will be the most comfortable, relaxed skirts you will ever make or wear. Featuring cascading tiers and patchwork designs, Flirty Skirts will leave you feeling free and graceful. Gentle gathers between each tier create a soft, feminine look - perfect for a day in the countryside, unwinding at the beach or some fun shopping. Whether you choose to make a stunning long or short ladies skirt or a delightful little girl's skirt with matching applique top, Flirty Skirts are guaranteed to make you happy!!
Pattern includes the following sizes:
LITTLE GIRL'S SKIRT -
sizes 6 months, 1, 2, 3, 4 and 5
LADIES LONG AND SHORT SKIRTS -
x-small: hips 36" or 91cm / midriff 26 1/2" or 67cm
small: hips 38" or 96cm / midriff 29" or 74cm
medium: hips 40 1/2" or 103cm / midriff 32" or 81cm
large: hips 43 1/2" or 110cm / midriff 35" or 89cm Added on May 21, 2009
Material and material requirements:
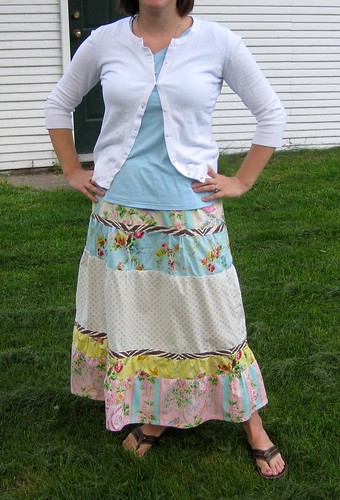
This depends on the skirt you make and your size. I used a five different 1/2 yds from a set of Jennifer Paganelli's Flower power line, and about 2/3 yd from a blue and white polka dot fabric from my stash.
Pattern as described/shown?
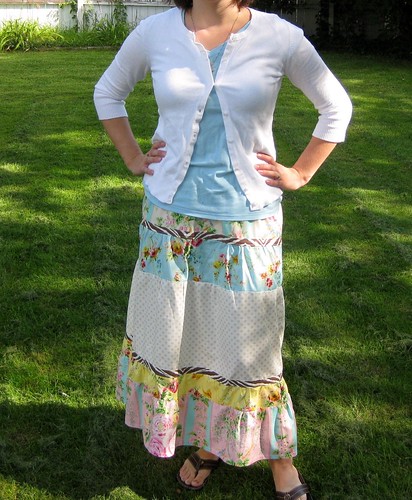
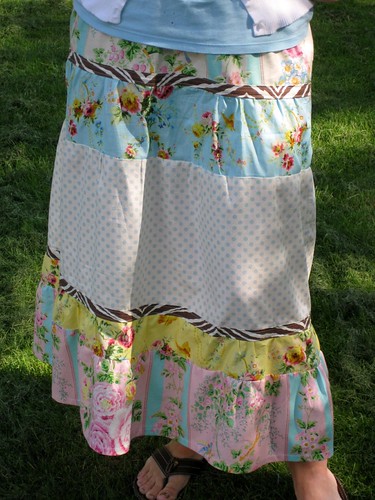
This skirt turned out very well and looks very much like the long skirt shown on the pattern. I was trying to work with a half yard set that I already had in my stash, and so I ended up being about an inch and a half short for one of my pieces. I am short so I didn't think this would be a problem. However, it is just about perfect on me, and I am short (5'3"). Plus, I am wearing this skirt at right about my belly button. So if you are tall or want to wear it higher on your waist I would probably add an inch to a couple of the tiers.
How were the instructions?
The instructions were clear and well organized. I was never confused, and there were just enough diagrams to help understand her directions.
Difficulty of pattern?
This is a pretty easy pattern. The only difficult thing is the amount of gathering you have to do for each tier. So I would say that you should at least have done one gathering project before attempting this pattern just to avoid frustration. However, there are no real pattern. You just cut rectangles (rotary cutter comes in handy for this!) and the overall construction is simple making it a good project for a beginner!
Alterations made?
The only alteration I made is just shortening a couple of tiers to accommodate using the half yard cuts I already had. Otherwise, all directions were followed. I did, however, have about a yard extra of trim leftover from the zebra print. So you can definitely cut out less. You also might want to top stitch on the tiers that are not covered with the trim just to give it a cleaner look. I keep meaning to go back and do it to mine, but you know...there are other things to sew! ;0p
I love my new skirt! I don't have any long skirts currently, and I love the soft ruffles and feminine feel of this skirt. It came together quickly. I made this skirt on a Saturday for a fun and easy weekend project. I also love the fact that it comes with instructions for making a little girl skirt as well.
Monday, July 13, 2009
Pattern Review: Study Hall Skirt by Anna Maria Horner

Nichole of Indie House brings you this pattern review of Anna Maria Horner's Study Hall Skirt Pattern. Check out all of her wonderful creations!
The pattern can be found in my shop: http://mvansciver.etsy.com!
Description from back of pattern:
Bookish? Yes! Boring? Never! This kicky pleated skirt has plenty of flattering structure, but lots of room for interpretation. Four inverted box plats, 2 front & 2 back, and border all around leave you a novel of options!
Material and material requirements:
44in Wide Fabrics/ 54in Wide Fabrics:
1 1/3 yards for main skirt fabric
1 yard for contrast fabric
Allow extra yardage for matching or centering prints.
Suggested Notions & Tools:
1 Spool of thread in coordinating shade, craft scissors and sewing scissors, rotary cutter and mat (optional), straight pins, measuring device, fabric markers or chalk, iron and ironing board, pressing cloth, turning tool, hand sewing needle, One 9 in invisible zipper in coordinating shade, invisible zipper foot, small hook and eye
I used a home decorator weight fabric by Alexander Henry for the main skirt fabric and Kona Cotton in black for the contrasting fabric. Personally I think this skirt needs the structure of a heavier weight fabric. You could certainly use lighter weight quilter’s cotton but if you do I recommend reinforcing it with interfacing.
Pattern as described/shown?
I ADORE this skirt! I’ve been looking forward to making it since images of it were released on Anna Maria Horner’s blog but I was worried it would be too hard. I’ve seen a few reviews saying it requires intermediate sewing skills but I don’t think that’s true (and I am definitely a beginner!). Yes there are a lot of pieces and that can be off putting but really you do the same set of techniques four times and you are done!
How were the instructions?
The instructions were fairly clear and there were lots of line drawings to accompany them. I had to reread some of the instructions for the box pleat the first time but I was able to figure it out quickly.
Difficulty of pattern?
Skilled Beginner. This shouldn’t be your first skirt but if you’ve completed a garment or two then you will be fine!
Alterations made?
I didn’t make any alterations. I knew the size small was a little large for my waist line but I wanted it to hang lower than my belly button. Next time around I may shorten it so that the hem hits above my knee the way it does on the pattern cover.
Overall Impression
I loved it. The cutting and zig zagging of all the raw edges was time consuming but once I started sewing the pieces together I couldn’t stop! Now I don’t want to take the skirt off, I’m already planning two or three more.
Saturday, July 4, 2009
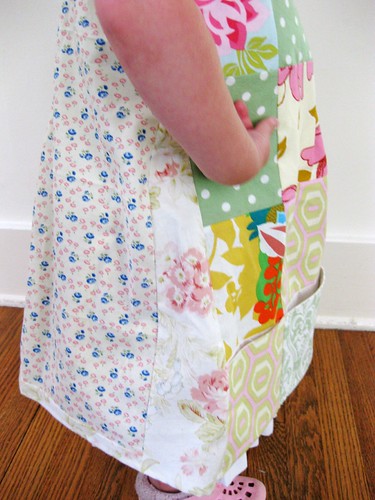
Pattern Review: Little Picasso- A Simple Play Smock

Front view
Little Picasso Pattern- You can find it in my shop!
Description from back of pattern:
These simple painting or playing smocks are cut from two squares and sever rectangles total. No templates or patterns, just a few cuts will yield these sweet little apron styles msock great for kids of any age. This loose fitting, casual size fit ages 3-5 with simple strap and gusset alterations. Tips given for easy sizing up to 7 years old. A simple size chart is also provided for reference. Choose patchwork or plain styles, gathered or tucked...a fun afternoon project any way you stack it!
Material and material requirements:
This pattern uses quilting cottons.
Patchwork Smock:
1 Charm Pack OR 16 5" squares for front
1/4 yard for pocket back
5/8 yard for back
3/8 yard for pockets
1/4 yard for gusset
1/8 yard for straps
1/8 yard for facing
Soft Vintage Smock:
5/8 yard for front & back (OR 2 separate 5/8 yard cuts if you want different colors on front and back)
3/8 yard for pockets
1/4 yard for gusset
1/8 yard for straps
1/8 yard for facing
Plus two buttons for straps.
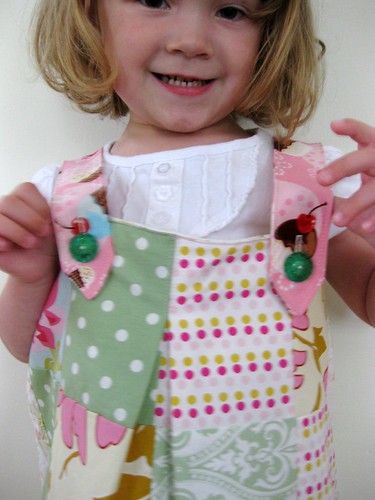
I used different fabric scraps for the different parts of the apron, which I always find fun. It is nice putting those nice scraps to use! The only part I didn't use a scrap was the back, which I used a fat quarter for. For the buttons I used two little green vintage buttons that I got awhile back from our farmer's market.
Pattern as described/shown?
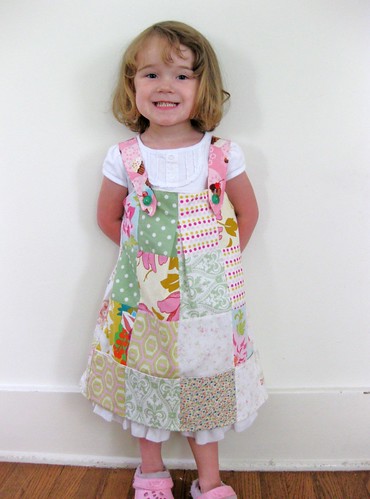
Overall, I was very pleased with how this smock turned out. I made the patchwork version with the center pleat. I do think it turned out just how it was shown on the cover. However, I think this pattern is maybe a little more complicated then it is made out to be because you do have to "make" the pattern pieces yourself as you cut.
This is where this pattern falls short. I thought there were some definite areas that needed more explaining (especially if you haven't made clothing before) For example, she doesn't explain to clip the corners on the straps so that the points come out nice and smooth, and she doesn't give instructions at the end for a buttonhole an far down to place the buttons.
Shorter back matches the patchwork pocket front.I also thought some of the measurements were off.
1)In the patchwork version she has you cut out two 5 1/2" x 18 1/2" rectangles for the back of the pocket. However, this did not match up when you added the front part of the pocket. So, I cut these out 5" x 18 1/2". I don't think this is a problem in the simple version since you just cut one big piece and fold it in half.

Gusset
2) I also thought the gusset measurement was too long, but this isn't that big of a deal since you can just shorten it once you sew it all together and before you hem it to see where it needs to be.
Difficulty of pattern?
Intermediate
This pattern wasn't difficult but because you have to cut and make the pattern pieces and the instructions were not the clearest I would not recommend this pattern for beginners. Since I have made similar things to this I didn't find it that big of a deal, and it still came together fairly quickly. It only took me about three hours. So, if you are familar with clothing, I think you will be able to see what needs to be done and where you need to "fill in".
Alterations made?
I didn't make any alterations to the pattern except for making the measurement changes that I mentioned above. I also used a fat quarter for the back which was 1/2" shorter than what the pattern called for, so I sewed on a little strip at the bottom to lengthen it.
I think this pattern could easily be made without the gusset. I don't know if it adds much to the pattern necessarily, except I think it gives it a cute patchwork look! However, if you want to skip a step this would be it. I also think you could make the whole thing out of patchwork if you wanted. She has you use a single piece of fabric for the back, but you could easily make a patchwork back for this as well.
Overall Impression
I really liked this pattern. I think it is super cute and pretty quick to make! I think next time I make it I could sew it under two hours. It is perfect for Juliana for her art projects and when she helps me make choc-o-latte cookies with me! She immediately stuffed some crayons in her little pockets at the bottom, and she was all set!
Tuesday, March 24, 2009
Easter Dresses
I loved the bubble skirt part of the new Miss Lily pattern by The Handmade Dress. I knew it would be perfect for the girls' Easter dresses. Samantha recommended using a non wrinkly fabric for the dress since it is a difficult dress to iron, so we picked out some seersucker material at Joann's. Juliana chose her bright orange floral, and I picked the polka dots for Felicity since I really love polka dots!
The pattern went together well and fast. If you are looking for a simple and easy dress, I would recommend this. I love the bubble skirt, and you don't have to hem it! Be careful with the sleeve and bodice part because they are very similar, and I mixed them up while sewing Juliana's. The only thing regarding fit is that I would say is that I think the bodice is a little big. I really do tie those ribbons in the back to make it a little more form fitting. Portabello Pixie's Claire pattern uses a similar peasant style top, and I think the fit is a little truer to size on that dress. Overall, I am super pleased to have completed two dresses in a weekend!

She doesn't want to hold my hand!
Wednesday, March 4, 2009
Purse Organizer- Pattern Review
I make a lot of bags. I would love to use a lot of my different purses, but I confess I don't. So what about a purse organizer? I have seen some patterns/tutorials here and there that looked okay. Then I found The PortaPockets Purse Insert Pattern by Studio Kat Designs, and it looked like exactly what I was needing.
THE GOOD
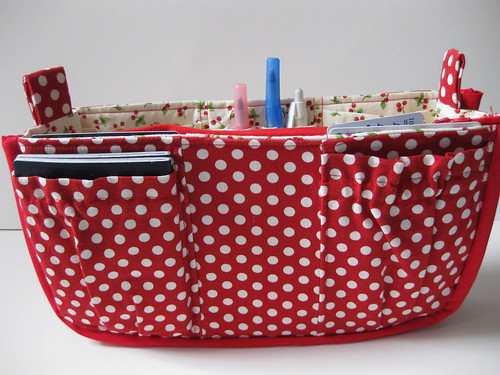
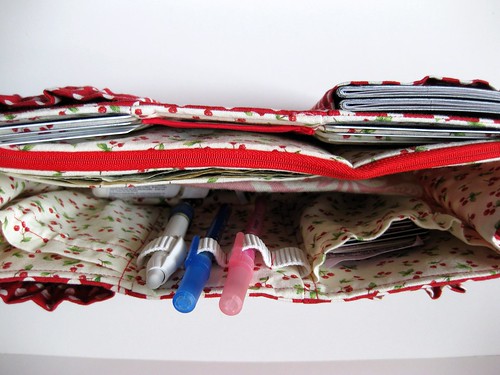
This is an awesome purse organizer. I made the large insert because I have a lot of stuff! Plus, I usually carry bigger bags. It actually is more of a giant wallet. You have room for six credit cards, bill fold, zipper pouch for coins, two inside pockets, pen holders, and four outside pockets, plus a roomy interior on one side.
THE BAD
Not for the faint of heart or for a quick project. There are SOOOO many pieces she makes you cut out, and of course for some reason I cut about six of them wrong. Definitely, NUMBER your pieces if you are going to make this. I kept sewing wrong pieces together, and I almost pulled my hair out. Plus, the binding at the end involved a lot of hand sewing. It took me several hours over the course of a few days to make this little thing.
In the end, I am pleased with the result. Just be sure you really WANT to make this. :0)
Outside- Loving these polka dots.Thursday, February 12, 2009
My Favorite Bag Pattern


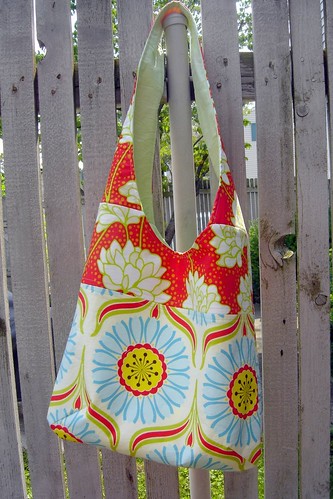
My favorite pattern of all time is Pink Chalk Studio's Mail Sack Pattern. This is a large sling bag that carries everything, and I love the fact that you don't have to worry about it falling off your shoulder. (Something that I find happens often while trying to carry two little ones.)
THE GOOD
The pattern itself it very well written. Just enough description so you know what she is talking about, but not too wordy that you get lost with what you are even doing.
I have made so many of these bags that I have lost count, and I always get compliments on mine. (The green one in Garden Party fabric by Anna Maria Horner.) She recommends that you use home dec fabric for the outside and quilting cotton on the inside, but I have used quilting cotton for the outside just making sure to interface and that also works well.
There is a zippered pocket and a large slip pocket on the other side that both come in very handy, and she has good instructions for doing the zipper. She recommends using a glue stick on the zipper to help it stay put, and it works really well!
THE BAD
There really isn't anything bad about this pattern. It turns out a fabulous bag again and again. The only thing I would change is her instructions for how big to make the slot for the zipper. I think it is about 1/4" too big.
Otherwise, if you are looking for a great bag (This one is great for trips or even for a school bag!) Get it. You won't regret it.
This was the first pattern that I carried in my shop I love it so much.